There are three things I need to get into the restorative zone. First, I need to do a little movement. For me, a short video, or a quick walk around the block gets my muscles warmed and ready to relax.
Second, I need the right space. In order to stay relaxed it must be warm and cozy, so I turn up the heat and pile on the blankets. (The only reason my pile of blankets does not appear in the photos below is so that you can see the form of the pose). I sometimes like to hear soothing music, but other times I prefer silence. A distraction-free space is best if you can find one. Turn off your phone, the tv, and any other noisemaking device. (That being said, sometimes I set an alarm for the end of my practice in case I fall asleep).
Finally, I need the right attitude. Turn the lights down, spark a candle, and stare at the flame. Stare at it until everything in background starts to fade. Stare at it til your eyes start to water. Watch the light start to twinkle through your tears. And then stare some more. Use your imagination to visualize the heat and light absorbing into your body, and the fire burning up all your negative thoughts. You can even do this while in some of the poses below (like Sleepy Bear). I also find it helpful to practice a 1:2 breath, in which you make your exhale twice as long as your inhale. It’s easy and incredibly soothing.
That’s it. Warm up your body, chill out your mind. Breathe, rest, repeat, enjoy!
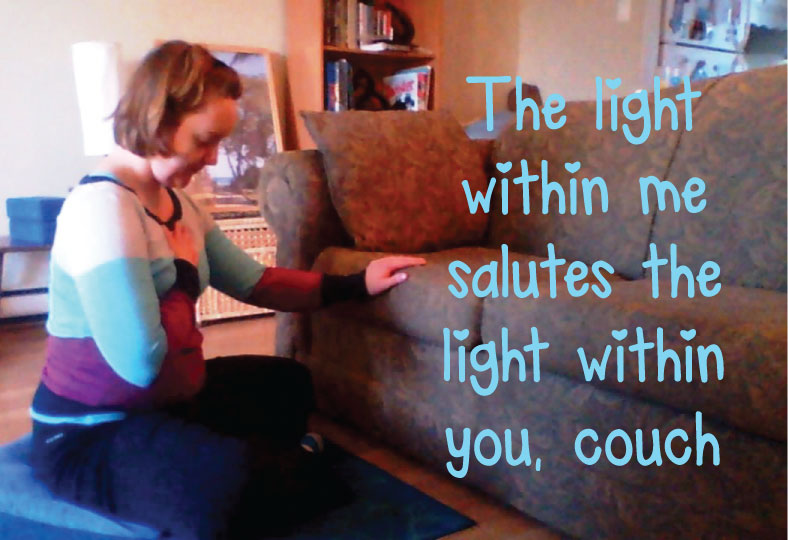
 Couch Honouring Pose
Step 1: Sit on your mat, facing your favourite couch or comfy chair. You may wish to place a folded blanket under your mat to make it more comfortable.
Step 2: Bring the hands together in front of the heart, and bow your head towards the couch. Then place one hand over the heart and the other on the couch.
Step 3: Breathe deeply, in through the nose and out through the mouth. On each inhale, draw the majestic relaxation powers of the couch into your heart and mind. On each exhale, emanate love and joy toward the couch.
Step 4: Meditate on the joy of the couch for 3-7 minutes. When you are finished, bring the hands together at the heart, bow your head, and say “Namaste,” which in Sanskrit means ‘the light within me salutes the light within you.’
Note: Beginners will find this to be an excellent starting point for their practice, and may wish to stay on the couch when first attempting this pose, or use it as a transition onto the mat.
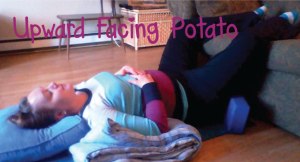 Upward Facing Potato
Step 1: Find a couch, chair or pile of pillows that will hold your legs up at a comfortable height. Line up the short end of your mat with the edge of the prop, and arrange blankets and pillows to support your head and limbs. I like to have padding beneath my upper back, though you may prefer to pad the lower back instead.
Step 2: Sit on the floor next to your mat, with one side of your body resting against the couch. Roll back onto the mat and bring your legs up onto the couch. Arrange your props comfortably under your head, arms and back.
Step 3: Let your knees flop open on the edge of the couch. You can use blankets or blocks to prop up the thighs (pictured) or use a strap to lasso the legs to one another. You may wish to cover yourself with a blanket.
Step 4: Close your eyes, deepen your breath, and imagine yourself like a potato, buried in soft, warm earth from the neck down. Feel your body relax and root into the earth as your muscles soften. Hold the pose for 3-7 minutes.
Note: Advanced practitioners may try this laying on the couch with their legs on the arm or back of the couch.
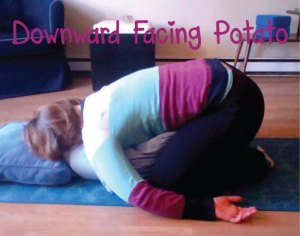
Downward Facing Potato
Step 1: Pad your mat with a layer of blankets (not pictured, but highly recommended). Use a bolster, stack several pillows, or roll a blanket to be placed along the front of the body.
Step 2: Come to hands and knees on the mat, with the bolster between the knees. Bring the hips towards the heels, lowering your body to the bolster. If this causes strain in the knees, place a couple yoga blocks or pillows under the butt to keep the hips lifted. If there is too much pressure on the tops of the feet, place a rolled towel or small pillow under the fronts of the ankles.
Step 3: Place a pillow under the head if desired. Turn the head to one side, and about halfway through the pose, turn it to the other. You may also place a blanket under the forehead and turn the face toward the floor.
Step 4: Bring the arms to a comfortable position beside the body. Breathe into the back of the body and feel the muscles along the spine soften, like butter melting on a hot potato. Feel the butter sliding toward the head and the heels and dripping onto the floor. Hold the pose for 2-5 minutes.
Note: This pose may also be practiced in bed or on a wide couch.

Sleepy Bear
Step 1: Pad your mat with a layer of blankets if desired. Use a bolster, stack several pillows, or roll a blanket to be placed along the front of the body. You may wish to place a yoga block under the end of the bolster where your head will be to prop it up higher than your hips.
Step 2: Sit on the mat with the lower end of the bolster or blanket roll next to your right hip. Bend the knees and tuck both feet towards the left hip.
Step 3: Twist your torso to the right, placing one hand on either side of the bolster. Lower your chest to the bolster, turning your face to the right if it’s comfortable. Cover yourself with a blanket and wrap your arms under the bolster.
Step 4: Imagine you are hibernating for the winter in a cave. Hug the bolster gently and feel your breathing and your heart rate slow down. Come out of the pose slowly, before practicing on the other side. Hold for 3-5 minutes on each side.
Note: This pose can be done very comfortably under the covers before bed. Be sure to switch sides before you fall asleep.
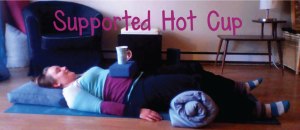 Supported Hot Cup
Step 1: Prepare hot cup. Chai tea and apple cider recommended. Beginners may wish to use a travel mug with spill-proof lid.
Step 2: Lay down on your mat. Place a rolled blanket under knees to release low back tension, and pillows under head if desired. Place block on belly and hot cup on block.
Step 3: Inhale through the nose, feeling the hot cup rise as the belly expands. Exhale through the mouth, releasing the hot cup and the entire body towards the floor. Repeat until hot cup has cooled.
Step 4: When hot cup has reached desired temperature, roll to one side with cup in one hand. Gently press up to a sitting position. Gaze fondly at the nearest couch and sip blissfully.
Note: For your safety, keep one hand on the hot cup at all times.

Play Dead
Step 1: Pad your mat with a layer of blankets. Turn the lights down low.
Step 2: Lay on your back, with your legs about mat width apart, and the arms a few inches away from the body and palms up. You may wish to place a pillow or rolled blanket under the head, knees or feet.
Step 3: Cover yourself with a blanket, close your eyes and breathe slowly and deeply. Allow your body to fully relax into the floor.
Step 4: Stay in the pose for 5-10 minutes, bringing the mind back to the breath whenever it wanders. When you are finished, wake the body slowly with gently movements. Roll to one side and rest there for a moment before returning to sitting.
Note: Minds wander, so just breathe and try to be busy relaxing, and don’t beat yourself up if it wanders anyway.


 Coconut Sugar Scrub
 Baked Goods
 Spice Selection
 Mix CDs
 Sewing Projects